Design Process: How to Narrow Down Your Ideas & Define Your Design Concept
If you read my last post then you've probably already collected some great design ideas! But did you gather more ideas than you have space to implement? Or did you get caught up in all the pretty and select ideas without any intent on where or how you'd incorporate them into your actual house? If so, no worries, you're not alone. With the endless sources of inspiration available to us these days, it's easy to accumulate so much that it becomes more inhibiting than inspirational. So, if you're feeling overwhelmed, lost as to where to start, uncertain how to narrow down the options, stumped on how to apply the ideas to your space, and/or unclear on your design concept, then keep on reading!
When trying to finalize your design, there are a few things you should consider.
Budget & Timeline
We all want our dream home with every possible dreamy design detail we've encountered. And while I am very much a believer that you can get a dreamy house on a budget, it may not be the most idealized version. If you don't have unlimited time and funds, then you will have some limitations with the design. So, make sure you are prudent when making design decisions. What can you afford? What fits in your timeline? If something does not fit within these parameters, you don't necessarily have to automatically and completely give up on it. Rather, brainstorm if there is a variation of the design idea you can do that works within your budget and timeline. If not, accept it and move on to the many other great plans you have, and perhaps one day it can be a project for another year.
For instance, for our family room, I was really hoping for vertical shiplap on all the walls. However, after speaking with contractors, it was clear that this would be more than we bargained for. Not only was it far more expensive than we anticipated, but the work it required was going to stretch our timeline further than we wanted. So, we nixed it. And as we are currently putting the finishing touches on this space, I can truthfully say I still love it. In fact, it's my favorite room in the house!
Inspiration Item/Image
When trying to narrow down ideas, it can be helpful to have an inspirational item to refer to. This may be artwork, a fabric, or an area rug... These are the usual three I use and recommend as they provide a lot to work with: color scheme, pattern, theme, texture, shape, etc. Usually, the inspiration piece is something you've discovered or acquired at some point, determined you can't live without, and know it must absolutely make its way into your space.


For instance, while shopping online I came across the area rug above (left) and fell in love. It was unique and beautiful. So, it became the piece I centered a bedroom’s design around. Another day my husband and I were hopping around to thrift stores and came across the wardrobe above (right). We were hooked. We needed more storage and the color scheme already worked with what we were thinking for one bedroom. Plus, the painted scenes depicted a fox hunt, which is a common local event. In fact, at the time, we were excited about attending a fox hunt event that was occurring in our community. So, the wardrobe ended up dictating the theme for its bedroom. (I’ll be revealing the full rooms later on.)
If you don't yet have such an item, you could create an inspiration board (for the entire house and/or just one space). On this board you could include some of your favorite images - these may be of entire rooms or just dreamy pieces you've seen that you'd like to see in your space (whether it's the exact item or an affordable replica of it).
Whatever the inspiration is, it can serve as a baseline. So, as you sift through ideas, trying to decide what works in the space and what doesn’t, ask yourself with each design idea if it works with your inspiration item (or mood board).
Concept Statement
A concept statement is essentially a paragraph that describes your design concept, pinpointing your intent and goals as well as your methods. Writing one is a great way to take all those ideas floating around in your head, organize and prioritize them, then put them to paper. Once this is done, the concept statement acts as another great baseline when narrowing down choices. It is a great reference because it outlines the essence of the design and how you will achieve it.
So, how do you write one? First, have a brainstorming session where you just write down anything that comes to mind with the space. Think about:
Your inspiration and vision
The overall aesthetic you want to achieve
The feeling you hope the space to evoke
The function you want to be incorporated
In addition to outlining these goals, explore how you will accomplish each. The best way to do this is by considering how you will incorporate design elements and principles.
Design Elements and Principles
The design elements and principles are considered tools in the interior design profession because they guide designers as they create. They are not only essential for concept statements, but for the entire design process.
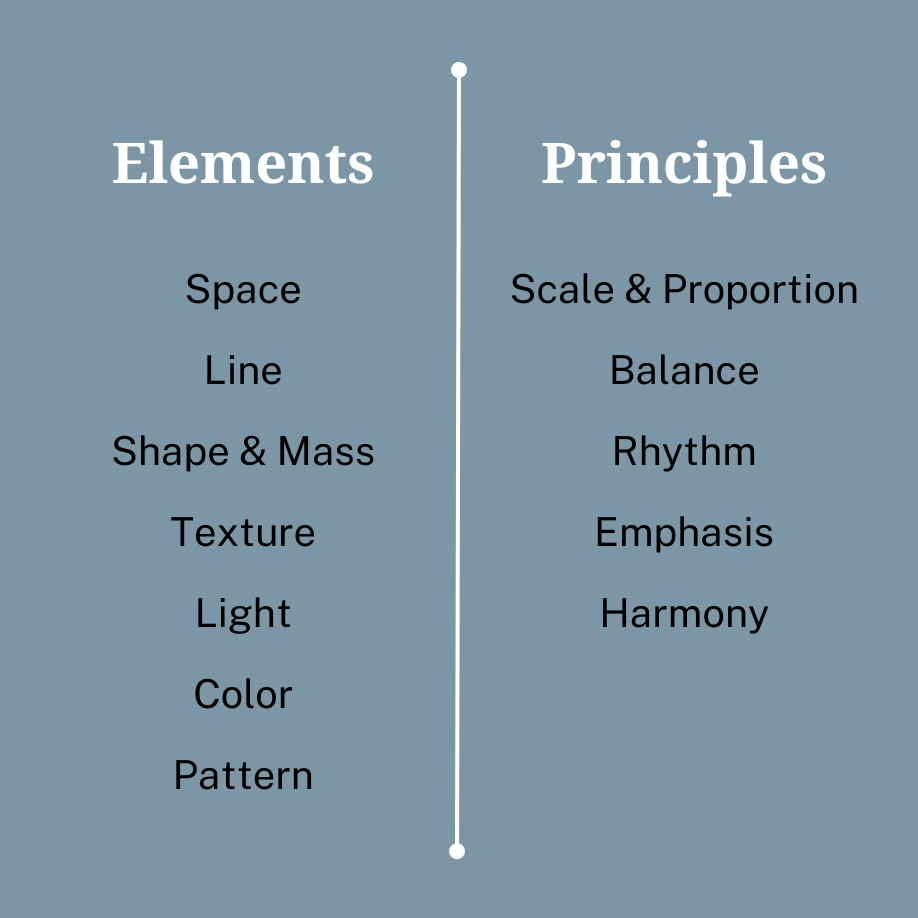
Design Elements:
Space
• Line
• Shape & Mass
• Texture
• Light
• Color
• Pattern
—
Design Principles:
Scale & Proportion • Balance • Rhythm • Emphasis • Harmony
Use these to help you develop directions for your design destination. Go through each and consider how you will incorporate them to achieve your goals. For instance, with texture: are you aiming for hard or soft, shiny or dull, smooth or rough - or a combination? And with balance: are you aiming for traditional symmetry or more modern asymmetry? Review these then summarize them in your concept statement.
For example, I may want to create a cozy colonial family room by incorporating curved lines, soft textures, traditional patterns, mood lighting, a balance between warm and cool colors, and harmony with natural wood and aged brass materials.
If designing multiple spaces within your home, it may be helpful to write a concept statement for the house as a whole to help you achieve cohesion between areas, but also one for each space to help you make their design distinct.
Breakdown Ideas by Category & Assign by Space
If you've done all the above, then you should have a very clear vision of what you want for your design and some great references to aid you in accomplishing this. Now it's time to go back to the many design ideas and inspiration images you've gathered and start narrowing them down and assigning them to spaces.
I recommend starting with breaking down your ideas and inspiration images into categories. These may be groups like colors, wall finishes, furniture, lighting, overall aesthetic/theme… Once these are defined, organize your findings into these groups. Then one group at a time, determine your favorites (considering everything above) and start assigning each to a space.
I like to do this using a floor plan of my home. For instance, I will take all my top paint colors and start spreading them out, placing one in each room. This helps me see all the potential application areas, allocate each option, and assess how they flow from space to space.
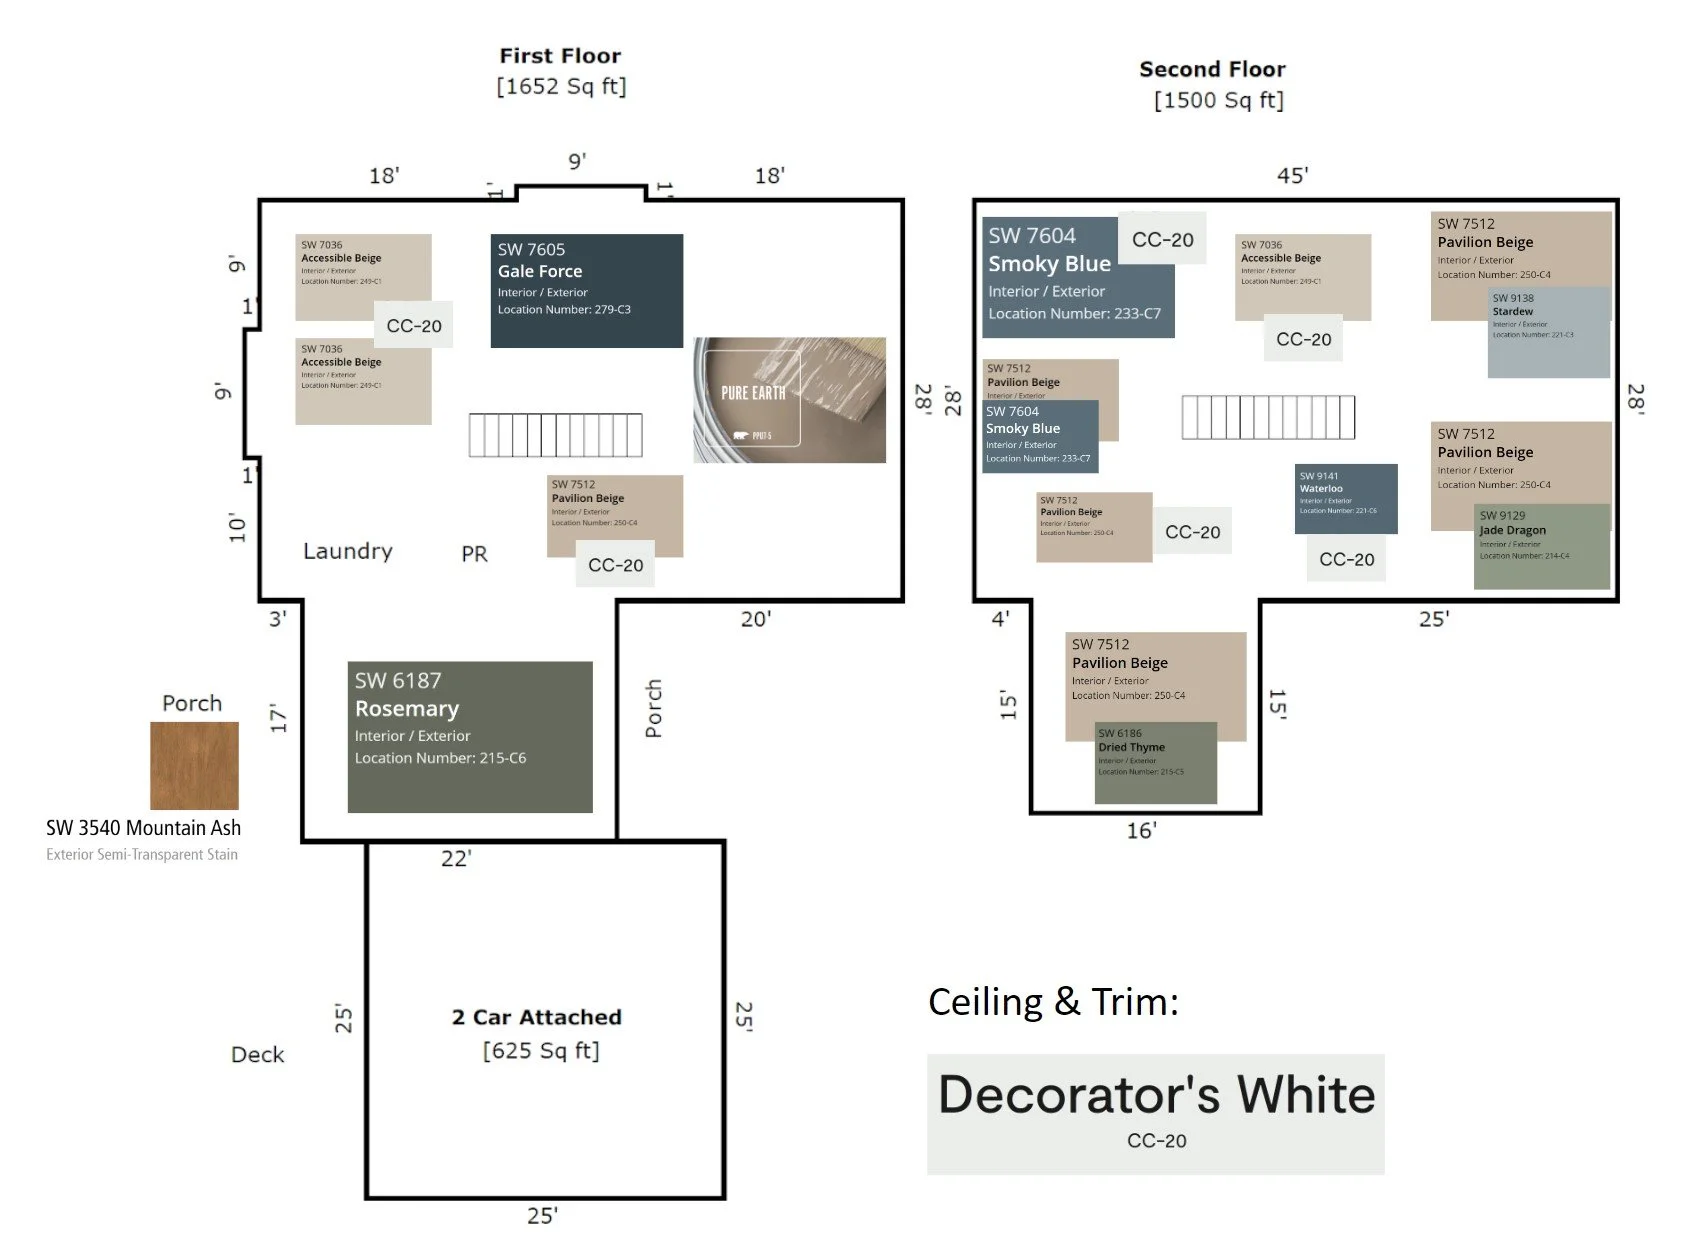
Here is my example of taking a floor plan (in this case, the home appraiser’s drawing) and placing paint colors in each room. You will see most have two colors (one for the walls and one for the trim and/or ceiling). I created this in Google Slides, using snips/screenshots from the paint company’s website and pasting them onto the slide.
When allocating colors, I considered what color would help me achieve the ambiance I wanted for each space. Examples: (1) I wanted the family room to be a little moody and rich, so I assigned my dark green shade here. (2) I wanted the kitchen to be light and bright, so I went with my lightest shade of beige. (3) I wanted the primary bedroom to have a calming color, so I went for my favorite deep blue shade.
Once I was done, I could see if all the colors together achieved the overall feeling and look I wanted for the home, as well as how one room color led to another.
If you don't have access to a floor plan and don't want to create one yourself, another option is to create a table like below. It doesn't allow you to envision the flow of the space as well, but it does help organize everything. You could even try listing the rooms in order of how they flow so there is some sense of their connection to each other.
Designers sometimes create similar tables in packets we refer to as “spec sheets”, which outline all specifications for the trades working on the project.
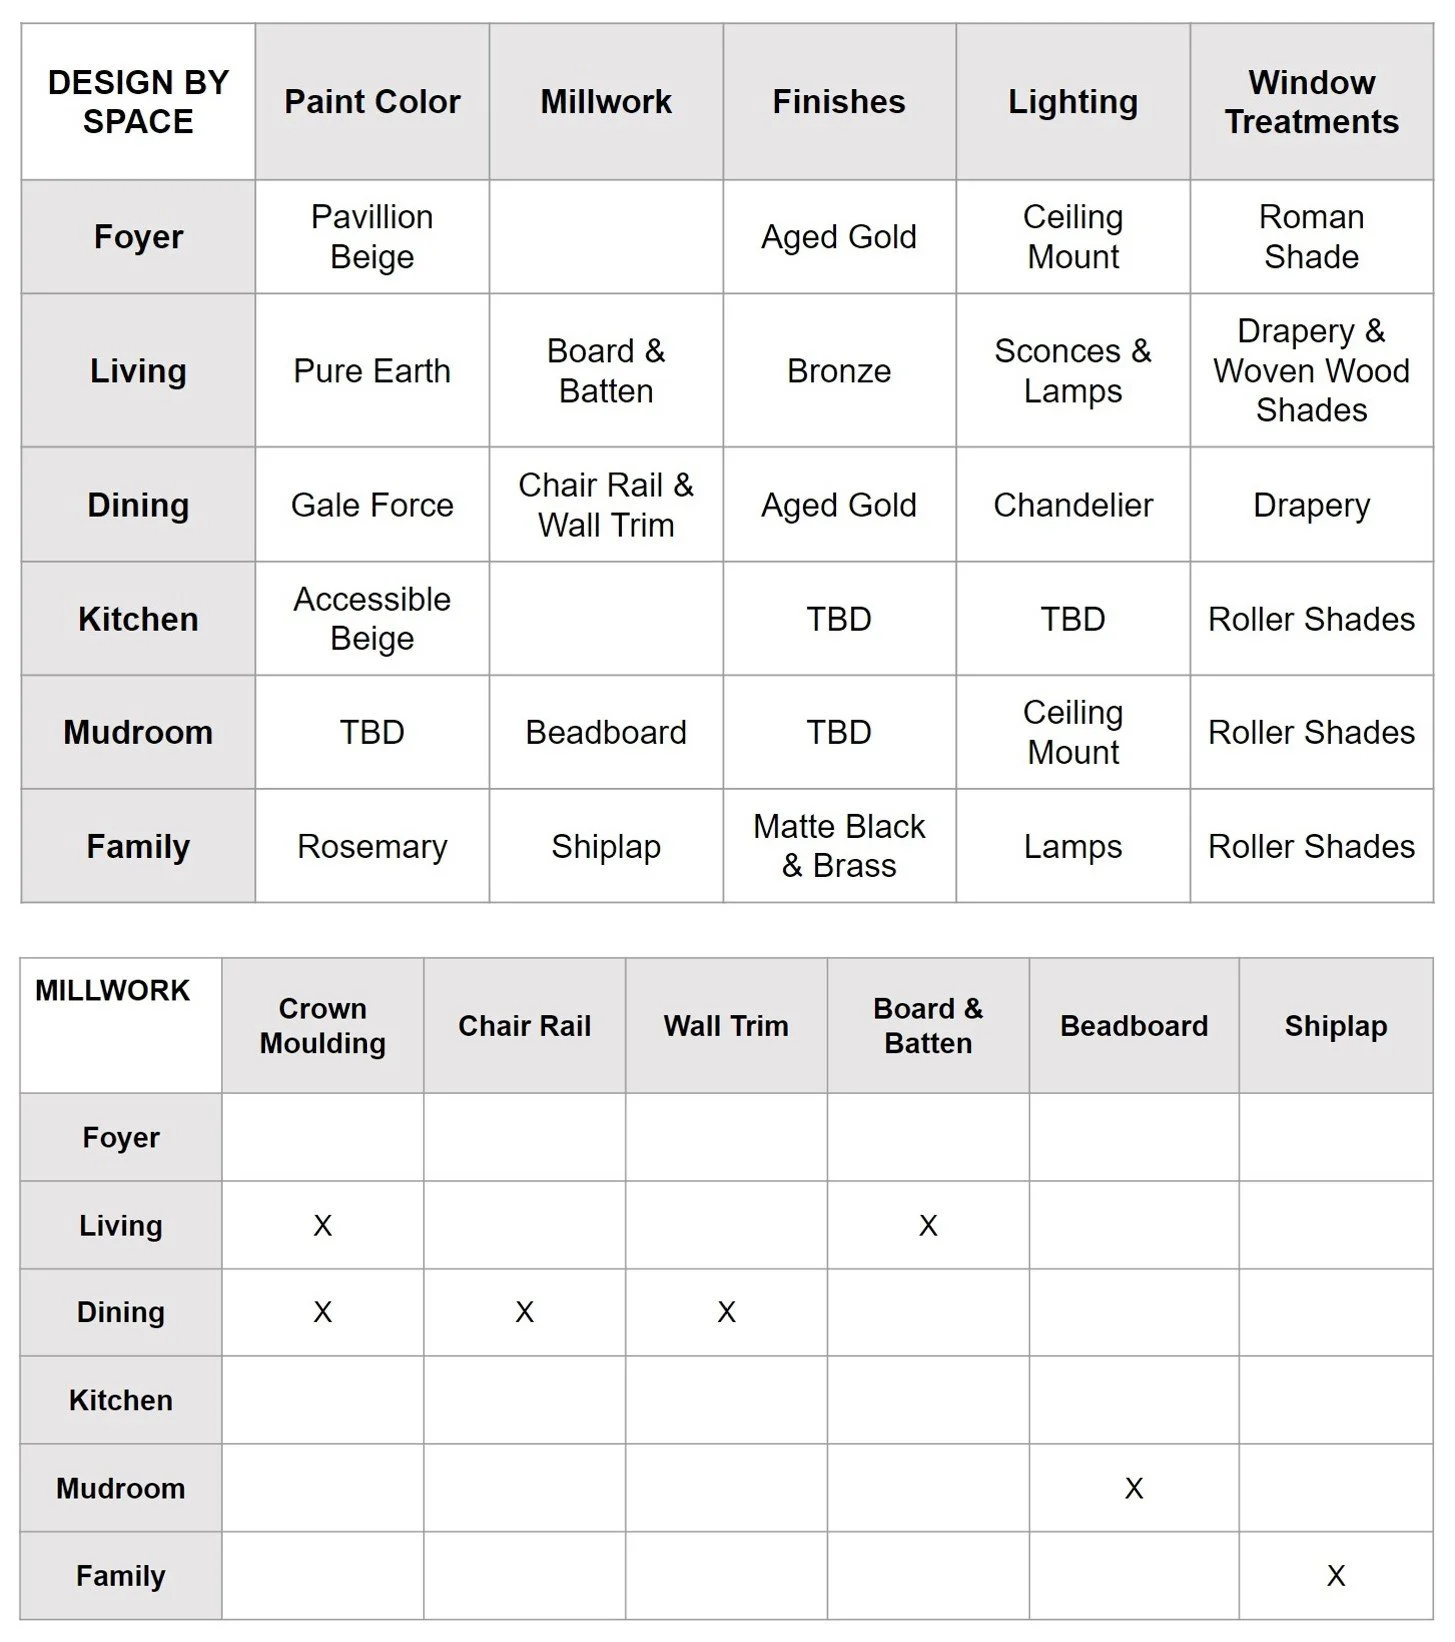
You could make one table for all major design decisions or a table for each design element.
One of my categories was millwork - being a lover of traditional and classic designs, I am obsessed with millwork and mouldings. I wanted shiplap, chair rail, panel moulding, wainscoting, beadboard, crown moulding, board and batten… Obviously, all of these would be expensive, so I had to consider the budget and what would work best for each space. Board & batten was one of my top looks I wanted in my house - nothing says colonial home like board and batten! So, I thought about what room would be best and my two main considerations when choosing were budget and room ambience. These helped me land on the living room. I wanted this space to be more formal, so it deserved and needed this special and sophisticated touch. Additionally, I knew that board and batten (done in its truest form) was very expensive, thus I could not afford to do a large amount of it. This made the living room even more ideal because it has a fireplace in which I could just add board and batten above the mantel (a small area compared to wrapping it around an entire room or even one whole wall). By applying this design idea here, I kept within the limits of my budget while still elevating the look of the fireplace and further emphasizing this focal point of the room.


A final option is to create what we designers call a bubble diagram. Typically these are used before space planning if a designer is creating a new floor plan as it helps them envision how they want spaces to connect and flow. But it can also be great for developing your design concept. You can make a legend of symbols, color code it, or just write keywords that represent the main inspiration ideas, elements and principles you want to achieve. This can also be a great alternate version of the floor plan option as you can draw each space's bubble in relation to where it is in the house, allowing you to see how design elements flow from space to space.
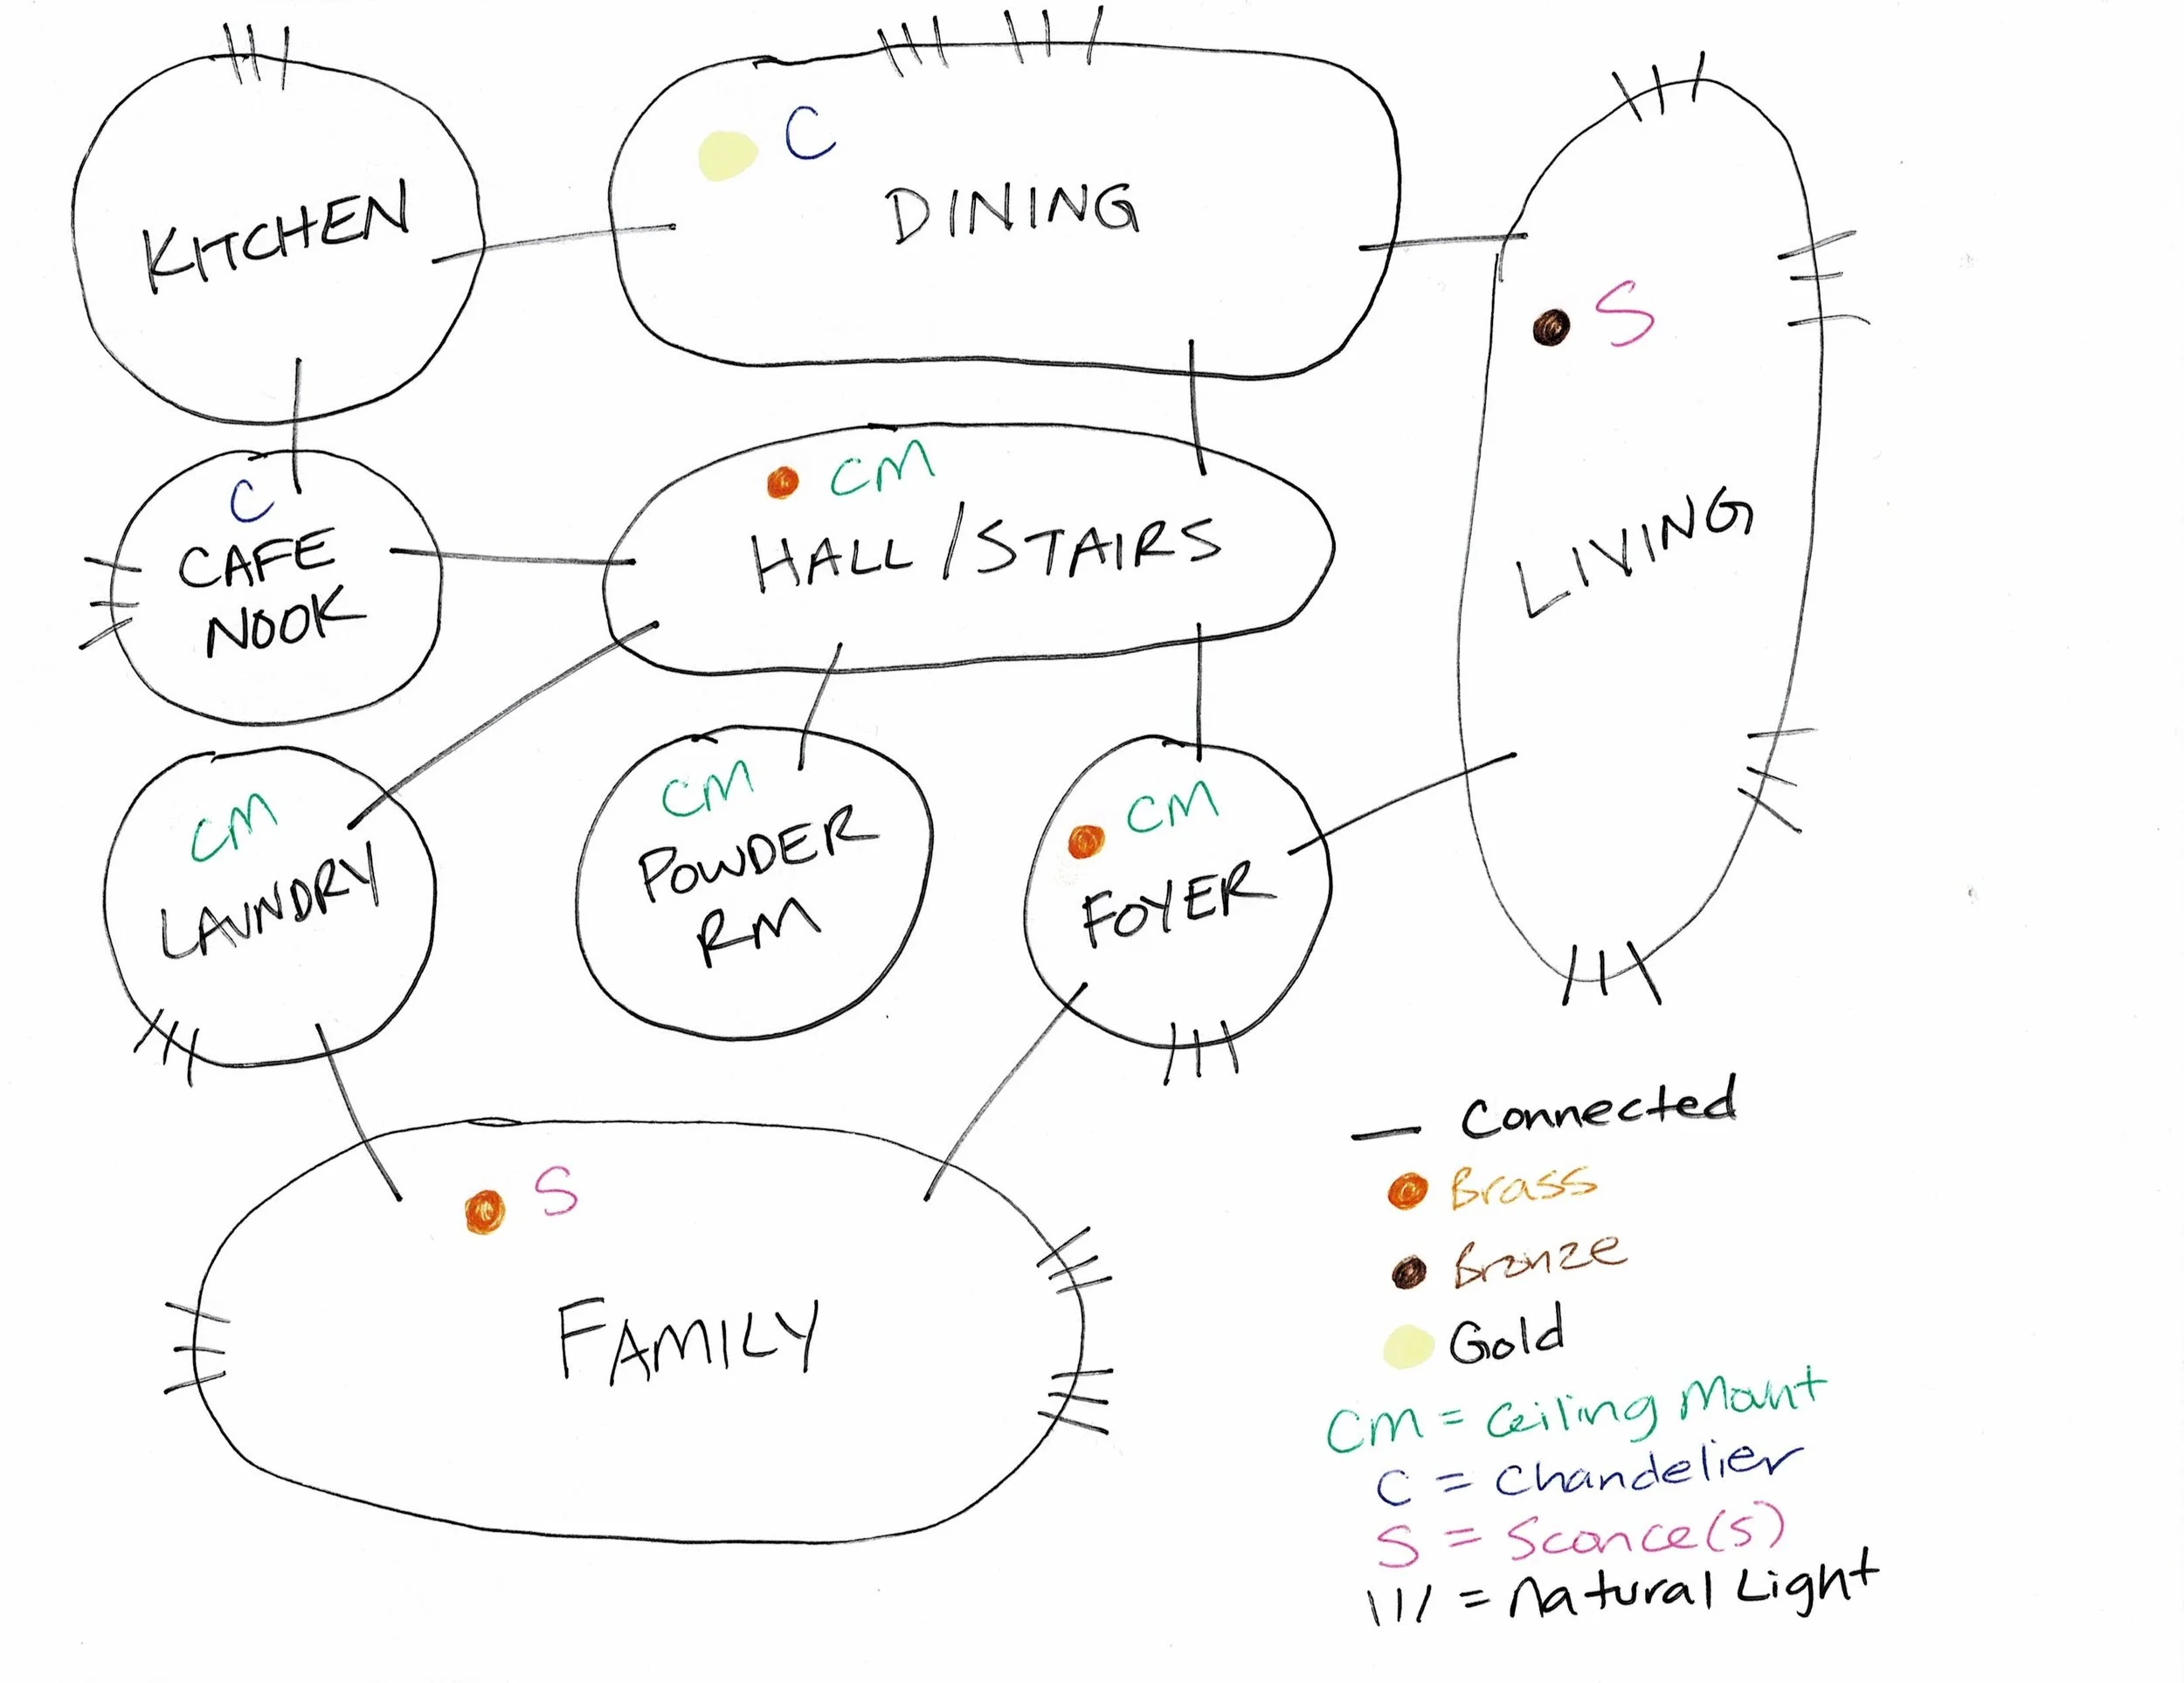
Here is an example of a bubble diagram, where I started indicating what finishes and lighting would be in each space.
Well, that wraps up my methods for narrowing down ideas and refining the design concept. I hope these considerations and tools help you in focusing your inspiration to create your dream design project!